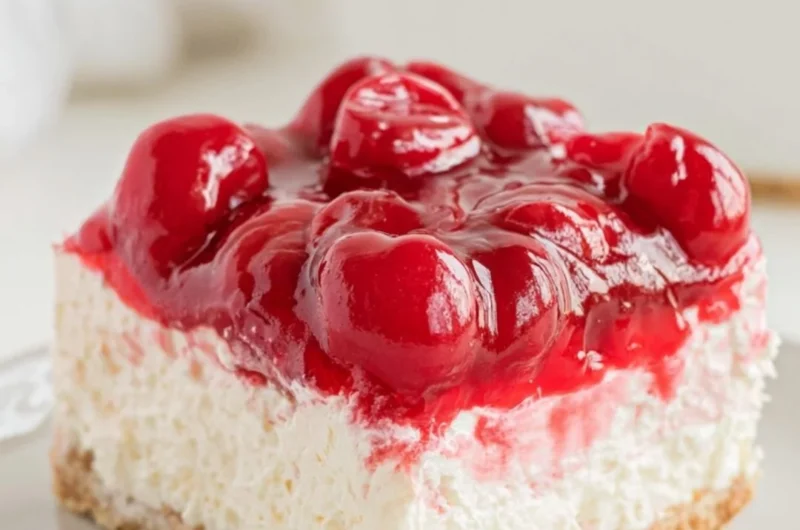
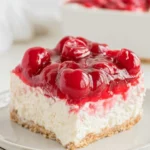
No Bake Cherry Cheesecake: A Creamy Delight
There’s something undeniably nostalgic about a fluffy, creamy cheesecake topped with bright, luscious cherries. Growing up, summer gatherings at my grandma’s house meant her iconic No Bake Cherry Cheesecake would always grace the dessert table. The moment I would hear that familiar whip of the mixer, a flood of warmth and joy would wash over me. This delightful dessert is a staple for lazy afternoons, family picnics, and cozy evenings on the porch, making it the perfect creamy fall dessert to bring a sprinkle of comfort into your day.
What I love most about my grandma’s recipe is its simplicity. With no baking required, it’s quick to whip together, making it ideal for unexpected guests or a sweet craving that comes calling late at night. Trust me, this is one you’ll definitely want to pin for later!
Why You’ll Love This Recipe
- Quick and Easy: With just a handful of simple ingredients, you can have this delicious creamy dessert prepped in no time!
- No Baking Required: Perfect for warm days or when you simply don’t feel like turning on the oven.
- Crowd-Pleasing Flavor: The combination of rich cream cheese and sweet cherry topping makes it an irresistible choice for family gatherings and parties.
- Customizable: Feel free to switch up the topping or flavors to suit your taste—there’s no wrong way to enjoy this cheesecake!
- Family-Friendly: Kids love helping out in the kitchen, and they’ll enjoy indulging in this treat just as much as the adults will.
What You’ll Need
Gather These Simple Ingredients:
- 8 oz cream cheese, softened
- 1 cup powdered sugar
- 1 tsp vanilla extract
- 1 cup heavy whipping cream
- 1 cup graham cracker crumbs
- 5 tbsp unsalted butter, melted
- 1 can cherry pie filling (21 oz)
Let’s Make It Together
Follow these simple steps for a delightful no bake cherry cheesecake:
- Prepare the Crust: In a medium bowl, combine the graham cracker crumbs and melted butter. Mix until the crumbs are evenly coated and resemble wet sand.
- Press the Crust: In a 9-inch springform or pie pan, firmly press the graham cracker mixture into the bottom to create an even layer. Chill the crust in the fridge while you prepare the filling.
- Whip the Cream Cheese: In a large mixing bowl, beat the softened cream cheese with an electric mixer until smooth and creamy. Gradually add in the powdered sugar and vanilla extract, mixing until fully combined.
- Make the Whipped Cream: In another bowl, whip the heavy cream until stiff peaks form. Gently fold the whipped cream into the cream cheese mixture until well combined, creating a luscious, creamy batter.
- Combine and Chill: Pour the cheesecake filling into the chilled crust, smoothing the top with a spatula. Refrigerate for at least 4 hours or overnight to allow it to set properly.
- Top with Cherries: Before serving, generously spoon the cherry pie filling over the top of the cheesecake, allowing it to cascade down the sides for a beautiful finish.
Delicious Variations to Try
- Berry Bliss: Swap out the cherry pie filling for a medley of mixed berries or a homemade raspberry sauce for a zesty twist.
- Chocolate Lovers: Add a layer of melted chocolate ganache beneath the cheesecake filling or fold in mini chocolate chips for a rich treat.
- Citrus Burst: Infuse your filling with the zest of one lemon or orange, and top with a tangy citrus glaze for a refreshing flavor.
- Nutty Crunch: Mix in crushed nuts such as pecans or walnuts into the crust or sprinkle on top for a delightful crunch.
Chef Emma’s Helpful Tips
- Make Ahead: This cheesecake can easily be made a day in advance—just keep it covered in the refrigerator until you’re ready to serve.
- Ingredient Swaps: For a lighter version, try using low-fat cream cheese and whipped topping while maintaining the deliciousness.
- Slicing Tricks: To achieve clean slices, dip your knife in hot water before cutting through the cheesecake, wiping it clean between cuts.
- Storage Suggestions: Store any leftovers in an airtight container in the fridge for up to 4-5 days.
What’s Inside – Nutrition Breakdown
- Serving Size: 1 slice (1/8 of the cheesecake)
- Calories: 280
- Carbohydrates: 28g
- Sugar: 19g
- Fat: 18g
- Protein: 3g
- Sodium: 200mg
Frequently Asked Questions
- Can I make this ahead? Yes! This cheesecake can be made a day ahead of time—just keep it refrigerated.
- Can I use different ingredients? Absolutely! Feel free to experiment with different fruit toppings or flavorings.
- How do I store leftovers? Keep leftover cheesecake covered in the refrigerator for 4-5 days for the best taste and texture.
- How long does it last? When properly stored in the refrigerator, it can last up to a week, making it a wonderful make-ahead dessert.
A Cozy Closing Note
This No Bake Cherry Cheesecake transcends mere dessert; it’s a warm, sentimental reminder of sweet family moments and cozy gatherings. Whether it’s for a special occasion or just a day that calls for something indulgent, this cheesecake provides a slice of joy. Save this No Bake Cherry Cheesecake to your dessert board so it’s ready whenever you need a cozy treat!
No Bake Cherry Cheesecake
- Total Time: 240 minutes
- Yield: 8 servings 1x
- Diet: Vegetarian
Description
A creamy dessert topped with luscious cherries, perfect for gatherings and cozy evenings.
Ingredients
- 8 oz cream cheese, softened
- 1 cup powdered sugar
- 1 tsp vanilla extract
- 1 cup heavy whipping cream
- 1 cup graham cracker crumbs
- 5 tbsp unsalted butter, melted
- 1 can cherry pie filling (21 oz)
Instructions
- Prepare the crust: In a medium bowl, combine the graham cracker crumbs and melted butter. Mix until the crumbs are evenly coated and resemble wet sand.
- Press the crust: In a 9-inch springform or pie pan, firmly press the graham cracker mixture into the bottom to create an even layer. Chill the crust in the fridge while you prepare the filling.
- Whip the cream cheese: In a large mixing bowl, beat the softened cream cheese with an electric mixer until smooth and creamy. Gradually add in the powdered sugar and vanilla extract, mixing until fully combined.
- Make the whipped cream: In another bowl, whip the heavy cream until stiff peaks form. Gently fold the whipped cream into the cream cheese mixture until well combined, creating a luscious, creamy batter.
- Combine and chill: Pour the cheesecake filling into the chilled crust, smoothing the top with a spatula. Refrigerate for at least 240 minutes or overnight to allow it to set properly.
- Top with cherries: Before serving, generously spoon the cherry pie filling over the top of the cheesecake, allowing it to cascade down the sides for a beautiful finish.
Notes
This cheesecake can be made a day in advance and stored in the refrigerator. For clean slices, dip your knife in hot water before cutting.
- Prep Time: 15 minutes
- Cook Time: 0 minutes
- Category: Dessert
- Method: No-Bake
- Cuisine: American
Nutrition
- Serving Size: 1 slice
- Calories: 280
- Sugar: 19g
- Sodium: 200mg
- Fat: 18g
- Saturated Fat: 11g
- Unsaturated Fat: 7g
- Trans Fat: 0g
- Carbohydrates: 28g
- Fiber: 1g
- Protein: 3g
- Cholesterol: 60mg