Cozy Memories and a Slice of Happiness
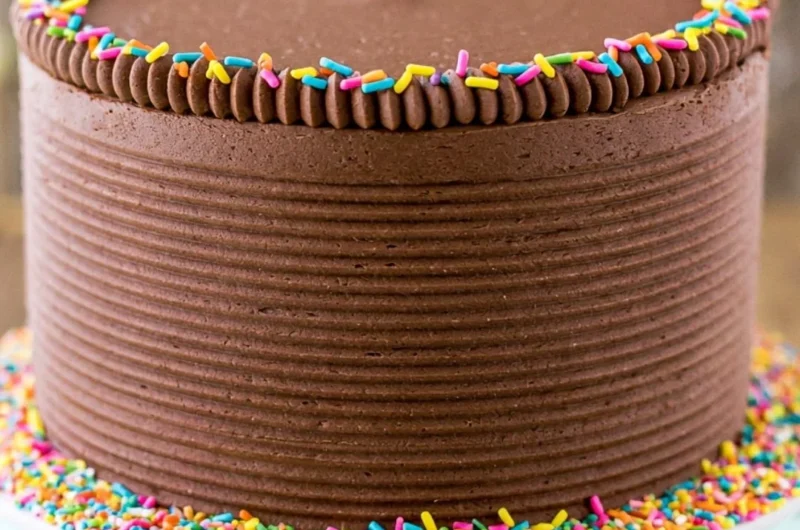
In our family, cake is more than just a dessert; it’s a symbol of love, celebration, and cherished memories. The aroma of a moist yellow cake baking in the oven takes me back to my childhood, standing on tiptoes to watch my grandmother whip up her famous recipes for birthdays and family gatherings. The vibrant yellow sponge, slathered in rich chocolate frosting, was always my favorite. Each bite was a warm hug, bringing smiles and laughter around the table. Today, I’m excited to share with you my favorite recipe for Moist Yellow Cake with Chocolate Frosting—an irresistible treat that captures the essence of joy and togetherness. Trust me, this is the perfect chocolate dessert to pin for later!
Why You’ll Love This Recipe
- Cozy and Comforting: This cake is nostalgic and brings that warm, homey feeling with every fluffy bite.
- Deliciously Moist: The buttermilk keeps the cake tender and moist—never dry!
- Perfect for Celebrations: Whether it’s a birthday, an anniversary, or a simple family get-together, this cake is sure to impress.
- Easy to Customize: Add your favorite sprinkles or fruits to make it uniquely yours.
- Loved by Kids and Adults Alike: It’s a crowd-pleaser, appealing to both young and old taste buds.
- Chocolaty Goodness: The rich chocolate frosting is the icing on the cake—literally!
Ingredients You’ll Need for Moist Yellow Cake with Chocolate Frosting
Gather these simple ingredients before we dive into the cozy baking session:
- 1 1/4 cups (300ml) buttermilk
- 3 large eggs
- 2 large egg yolks
- 1 tbsp vanilla extract
- 2 1/2 cups (325g) all-purpose flour
- 1 1/2 cups (310g) sugar
- 1 1/4 tsp baking powder
- 1/2 tsp baking soda
- 1/2 tsp salt
- 1 cup (224g) unsalted butter, room temperature
- 2 1/2 cups (560g) unsalted butter, room temperature
- 9 cups (1035g) powdered sugar
- 1 cup (114g) natural unsweetened cocoa powder
- 2 tsp vanilla extract
- 4–5 tbsp (60-75ml) heavy cream
- 1/4-1/2 tsp salt
- Sprinkles, optional
How to Make Moist Yellow Cake with Chocolate Frosting
Let’s embark on this delightful baking adventure together!
Make the Cake
- Preheat your oven to 350°F (176°C) and prepare three 8-inch cake pans with parchment paper in the bottom and baking spray on the sides.
- In a large bowl, combine the buttermilk, eggs, egg yolks, and vanilla extract. Pour about 3/4 cup of this mixture into another bowl or measuring cup, ensuring about 1 1/4 cups remains in the larger bowl. Set both bowls aside.
- In a large mixing bowl, combine the flour, sugar, baking powder, baking soda, and salt.
- With the mixer set to the lowest speed, gradually add the butter, one tablespoon at a time. Allow it to incorporate before adding the next. The mixture will eventually look like wet sand—this is perfect!
- Pour the larger portion of the reserved egg mixture (about 1 1/4 cups) into the dry ingredients and butter mixture. Stir on low speed until combined, then scrape down the sides of the bowl.
- Increase the speed to medium-high and beat until light and fluffy, about 45 seconds to 1 minute. Scrape the sides again.
- Reduce the speed back to low and slowly add the remaining egg mixture in a steady stream until incorporated.
- Scrape the sides of the bowl once more, then increase the speed and mix until combined, about 10-15 seconds.
- Divide the batter evenly among the three prepared cake pans and bake for 20-25 minutes or until a toothpick inserted comes out clean.
- Once baked, allow the cakes to cool in the pans for 2-3 minutes before turning them out onto a cooling rack to cool completely.
Make the Buttercream
- In a large mixing bowl, add the room temperature butter and beat until smooth and creamy.
- Gradually add half of the powdered sugar, mixing until it’s well-combined and smooth.
- Add the cocoa powder and vanilla extract, mixing until combined. Then add 3-4 tablespoons of heavy cream and mix until smooth.
- Slowly incorporate the remaining powdered sugar and salt, mixing until silky and smooth. Adjust the consistency with additional heavy cream if necessary.
Assemble the Cake
- Use a serrated knife to trim the domed tops of the cooled cakes for flat layers (check my tutorial if needed).
- Place one cake layer on a serving plate or cardboard round.
- Spread about 1 cup of frosting evenly on top of the first layer.
- Add the second layer, followed by another cup of frosting.
- Place the final layer on top and frost the entire cake with the remaining frosting. For a smooth finish, refer to my frosting tutorial if needed.
- Optionally, use a decorating comb to create patterns on the sides of the cake.
- Pipe decorative shell borders around the top edge of the cake using a frosting tip (I love the Ateco tip 844).
- Finish off with a sprinkle of colorful sprinkles for a festive touch! Store in an airtight container until you’re ready to serve. This cake is best enjoyed within 3-4 days.
Fun Ways to Customize It
- Vanilla Variation: Substitute half of the cocoa powder with additional flour and add a splash of almond extract for a delightful vanilla twist.
- Citrus Zing: Incorporate lemon or orange zest into the batter for a refreshing citrus flavor that pairs beautifully with the chocolate frosting.
- Nutty Delight: Add chopped walnuts or pecans into the batter for a crunchy contrast to the moist cake.
- Fruity Addition: Layer in fresh raspberries or strawberries between the cake layers for a fruity burst of flavor.
Chef Emma’s Helpful Tips
- Make-Ahead Love: Bake your cake layers in advance and freeze them! When you’re ready to serve, simply thaw and frost them for a quick dessert.
- Ingredient Swaps: If you don’t have buttermilk, you can substitute with 1 cup of milk mixed with 1 tablespoon of vinegar (let it sit for 5 minutes to sour).
- Effortless Slicing: Use a cake leveler or a long serrated knife to trim the tops of the cakes evenly.
- Storage Secrets: Keep any leftovers in an airtight container at room temperature for a few days, or in the fridge if your kitchen is warm.
What’s Inside – Nutrition Breakdown
- Serving Size: 1 slice
- Calories: 590
- Carbohydrates: 83g
- Sugar: 66g
- Fat: 26g
- Protein: 5g
- Sodium: 250mg
Frequently Asked Questions
- Can I make this ahead? Absolutely! You can bake the cakes in advance and freeze them until you’re ready to frost and serve.
- Can I use different ingredients? Yes, feel free to swap in dairy-free butter and milk if needed—this recipe can be adjusted to accommodate various diets.
- How do I store leftovers? Store your cake in an airtight container at room temperature for 3-4 days or in the fridge for a longer lifespan.
- How long does it last? This cake is best enjoyed within 3-4 days to enjoy its moistness and flavor fully.
A Cozy Closing Note
Nothing warms the heart quite like a beautifully layered Moist Yellow Cake with Chocolate Frosting. It’s not just about indulging in something sweet; it’s about savoring every moment spent with friends and family over a slice of pure happiness. I hope you enjoy making and sharing this cake as much as I do. Save this Moist Yellow Cake with Chocolate Frosting to your baking Pinterest board so it’s ready whenever you need a comforting treat! Happy baking!